Zen Luxury. Creating a Garden that is Lush. Easy. Peaceful.

Zen Luxury.  Creating a Garden that is Lush.  Easy.  Peaceful.

Thursday, May 27, 2010

3 Days Without Watering

Before I left town, I had some concern as to whether my plants could survive on their own for a full three (3) days. Frankly, I don't think these new plantings have sufficient root growth to support their search for moisture. Would there be any loss in plants? Would these planters be bone-dry when I returned?

Does "Moisture Control" potting soil really work?

Note that these questions are born out of my prior experience with the three white fiberglass window boxes (approximately 7" deep). In prior years, I planted with Miracle Grow standard potting soil. The resulting floral display was grand, yet the planters had to be watered EVERY day.

Set Up the Potting Soil Test

The weather over those three days was HOT and sunny. What a great test! Before leaving town, I heavily watered (till the water ran out the drainage holes)on Sunday at noon. On Wednesday night at 8pm, the containers were in good shape. I am pleased to note that every one of my containers had significant moisture.

In this quick review of Miracle Grow's product, I surveyed my:

1. large and small glazed clay pots
2. several 12" clay pots (notorious for being dry due to their porosity)
3. fiberglass window boxes
4. coco-fiber lined planters
5. faux stone resin planter box and urns

Accordingly, I am recommending this product for balcony, patio and container gardeners who may have an occasional lapse in watering. Please note that my plantings do not include any succulents. Therefore, if your plant needs to effectively "dry out" between waterings, this product may not be for you.

I will update my opinion as the season goes on. In a few days, I'm off for another 3-day holiday weekend and have no worries about this garden.

Guilt-free gardening!

Saturday, May 22, 2010

Love These Colors !

OH the view from my side of the balcony is getting quite yummy! Look at these great colors...


As for what other people see when they look up:


Yes, that is a photo of my balcony. From the ground, the window boxes do not look that lush yet. The trailers will need another 3 weeks or so to begin their drop. We are currently 3 weeks into "growing" season. I use that term loosely, since the spring here in the Northeast was cold, rainy and windy. Below the 3 white window boxes hanging over the railing, it is difficult to view the two large coco fiber-lined planters which I have hung inside the railing.

Close Up Photos

Of the following photos, only the first photo reflects plantings that face the courtyard.

The other wonderful plantings are deep inside my balcony railings and reveal their lush colors and textures only to me. I am in awe of their beauty.

It may be noteworthy that four of these plants were just inserted yesterday, and already they look quite at home in these window boxes.


Progress Photos

In the photos below, you may notice some brown edges and other damage from the recent COLD nights in the northeast. Here are a few photos the day after I did some Search and Replace. Finally got nearly everything planted. The last 3 stragglers are a mystery for me right now.

In the top photo, you can see (right) a portion of my two-tier rail planting. Also (left) is the rosin trough planter in which I tucked some lovely foliage plants that attracted my eye due to their differences. Two of the urns planted yesterday are in the foreground.

Yes, I have not cleaned up yet. Getting there.

And yes, my neighbor has nothing but green plastic chairs on that balcony in the background. Also visible are the co-ops rhododendrons -- and they are VERY old.


Friday, May 21, 2010

Bumble Bee Visit Today


I have seen this bee before and happily, today I had my camera to capture its visit.

A bee visit is like getting a blessing upon my abundant flowers. Yes!

One white butterfly flew by as well (c'mon, could it have been a big moth?). I guess I did not have the right mixture to appeal to the white butterfly contingency.

My balcony oasis was also visited by a couple of those very tiny bee-like insects. What are they? Must be smaller than 1/2" and very slender of body, not at all like a plump black and yellow bumble bee. These little insects gather nectar just like a bee.

May 21 Final Plantings & First Cut

You Got to Move It -- Move It

I got a bit ruthless today as I surveyed my balcony garden. A little "search and replace" was the order of the day.

My first replacement was this poor croton (see below) which suffered massive leaf loss likely attributable to previous heavy rain downpours off the roof. Will it recover? Ugh, it is moved to the ground level public garden along with the leftover coleus. Pulling that broad leafed foliage plant out of my window box allowed a bit more room for the last rex begonia. I also noticed that this last rex begonia was half the size of the one planted 2 weeks ago. A-yup. It needs to be planted.


Continuing on, I do not like the look of the dahlia either as the new flowers are 1/2 the size of the old ones. The plant seems healthy and solid, but it provides me with neither enough foliage or flowers, so dahlia gets moved to the ground level public garden.

I also removed a few plants that require direct (full) sun of over 6 hours per day simply because my balcony does not get that much sunshine. This allowed me to share my bounty with the common grounds at my co-op garden apartments. I found a small patch of sunny area where I planted the leftover petunias, marigolds, lilies and a few other items. Good luck to them. I will be able to enjoy those flowers as I walk by the garden.

Once I got those full sun plants out of my working space, I was able to concentrate on the remainder. Oh, there were lots of plants left still to plant! Yes, I got my two faux stone urns planted. One urn with the yellow hibiscus and the other with a blue hydrangea. Both urns have a few little side plantings. Neither urn looks all that good when I complete the task. What did not help these poor little plants is that I planted both urns LAST night, but I forgot to use the "Air Base" at bottom of urn. Drat! So, I redid my work today. See my product review later in this blog.


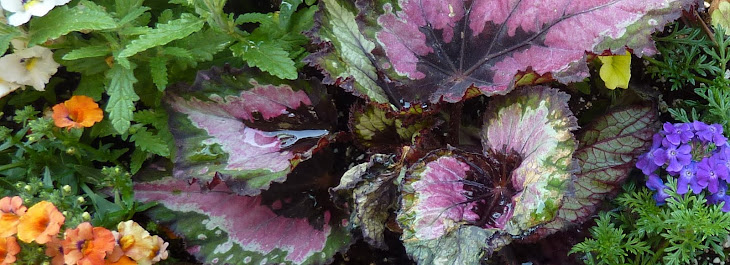
I wanted one more box, I call it a stone trough (resin), to be fully planted with shade foliage plants. I planted a Creeping Jenney, a foliage perennial, 2 coleus, one silver orchid and my last remaining rex begonia.

Note to self:

I like the foliage colors on those rex begonias and they are more adaptable than the crotons. Is it the "Moisture Control" potting soil that does not dry out which is causing the fading of all coleus growth? Poor performance from the coleus plants.

I distributed up my nasturtiums and a few other annuals by tucking them into the main planters here and there. They were going to get their own pots, but hey, I'm outta space and outta sunshine.

I also repotted my jasmine from its nursery plastic into a slightly larger clay pot. My original plan was to put this into a larger trough box with other plantings. My plans are altering today because, frankly, that balcony is real crowded!

Is there such a thing as Too Much Abundance?

I will leave out just a few more plants for this weekend. I am anxious to have all the plants situated because I will be away from home for 3 days. That is too long for those little pots to survive on their own. They need daily watering. It may be a good test of the potting soil.

Product Review on Air Base:

I used a product called "Air Base" as an insert in the bottom of two of my "cement" urn planters. Rather than just using a stone, this platform sits above the bottom of the pot and allows not only drainage but some aeration below the potting soil. Found out that fake stone urns are not entirely symmetrical, so the fit was a wee bit odd. I like the product and would recommend it.


Resin Trough

I used a 1/4" drill bit to drill several holes in the bottom of this faux stone box I refer to as a "trough" (since I believe this belongs on the ground due to its straight box configuration). The product is oddly soft and the drilling was easy. I then used that "Better Than Rocks" product in the bottom of the trough to allow for drainage and aeration. Additionally, I inserted a few small plastic planters upside down to simply take up space and insure less soil usage.

Thursday, May 20, 2010

Gotta Get These Planted


Time is marching on and I have not yet planted all these beauties that I purchased. Whew, focus. Get finished!

Full Sun vs Part Sun

Maybe the western exposure of my balcony has changed over the years. It seemed I had more direct sunshine years ago. For a dozen years, I planted predominantly Geraniums and Petunias with very good success.

Maybe the difference is that more of my plantings are inside my railings and therefore more protected from the sun.

Full Sun: Full sun exposure is defined as six (6) or more hours of direct sun. At this point, which is nearly 3 weeks into my summer planting, I have regrets for some of the Full Sun plants I have purchased including Ageratum, Marigolds, Petunias, Lilies and others.

Part Sun: It does make me wonder how to understand the concept of part sun. Less than 6-8 hours of direct sun. Does this mean that the shade plants would be over-exposed? Does it mean that my full-sun plants will fail to thrive?

It will simply be a matter of learning. I know that I will be moving some of the "sun" plants out to a sunny portion of the common grounds. I'll do some shifting and some cutting. Er, eliminating.

Cold Weather Damage as of May 20


I know that any damage I see on leaf edges, such as browning or dryness, are not attributable to under watering. I mean, over watering. Oh heck, we have had some deep soaking rains that have stripped most of the leaves off the Croton in the 2nd tier planter. Nothing here is under watered. Frankly, the planters do not seem to dry out at all.

How does that help the plants send out new roots? I don't know.

I see problems on 1 out of the 5 sweet potato plants. Only one of the alyssum has survived. My blue hydrangea has an ugly brown tinge to the flowers. Ugh. Since I have not repotted this to a larger summer pot, maybe the recent cold weather with night temperatures in the 40's has been an issue.

Water Feature?

I am still considering adding a feature with running water. I know. Where could this possibly fit in my limited balcony space?

Most garden fountains are powered either by electricity or by solar panel. I will select an electric pump of some type since my balcony has two outlets available. Both outlets are non-GFI. Sure, safety is for sissies.

The option of a solar fountain will not be suitable for me as the sun is insufficient and frankly, I could not put a solar panel in any place that would be visible by the public.

Research:

After hours spent reviewing water features available online, I find tabletop fountains, birdbaths with sprays, and fountains. Yeah, big fountains that may, or may not, bring in an Old World motif. While I find that many of these internet sales sites have great sales information, many of them do not include the sound of the fountains. Really? The SOUND is what we seek. That refreshing gurgle, that sound that masks our neighbors, airport noise, those delivery trucks.

1. Tabletop fountains: A key advantage for these little guys is that they do not take up much space and that is a positive checkmark for these diminutive items. On the other hand, most of them are rated for "indoor" use. Additionally, they are so small, will they be able to last 24-48 hours without a water refill? I notice that the majority of tabletop fountains are quite busy with designs, add-ons, rocks, etc. I would prefer something simple in design. A simple design indicates simple maintenance.

2. Garden fountains & birdbaths: Some of these are quite small in stature or weight. Many are made out of resin or other lightweight and cheap products. Customer reviews on those resin products under the amount of $300 indicate the fountains chip and crack after less than one year. I find this to be a pricey investment for a single-year enjoyment. I became enamored with several small birdbaths with fountain sprays. They are adorable. Unfortunately, they also appear to lack a strong enough base to stand up to a stiff breeze. Plus a bit too tall for my taste. If I lived in a house where I could look down at a bird bath, it would be a fun view.

Besides, I really was not planning on attracting birds to my balcony. Bird poo does not sound at all enticing for my lush little landscape. What I want is sound, but no birds.

3. Use What I Already Have: Oh this is the voice of Reason. How did this get in here? I own a small "fish pot" with heavy Asian painted details. How would this look outside? Judging from the videos I've watched on how to "build" or simply set up a small fountain, this is really a simple process to add a pump, a fountain head and some type of support or rocks to set up the fountain.

So, in conclusion, I think something smaller in a ceramic style would work. I found also that feng shui indicates the running water by the front door is a symbol of abundance, oh sorry, good fortune.

I need to find more room on that balcony.

Saturday, May 15, 2010

Videos => Trial by Rain and Wind

If the plants can survive this storm, they will be strong all season long. These new guys had somewhere between 7 days and 7 hours of acclimation. No new root growth to hold them. Mother Nature has this all figured out, Don't Ya Know?

Yes, I know that I was early to plant this season. Let me just blame that on enthusiasm. When the planting was completed for my 2 tier system, poor weather was predicted for the next two days. The initial rainfall was lovely:
Then the rain fell with increasing enthusiasm. Sorry I got no thunder recorded herein, it was just a quick "boom" and then gone.


Later, the rain stopped, and the wind Huffed and it Puffed (with gusts recorded over 45miles per hour). We had over 12 hours of this wind.

I am happy to report that my window boxes were intact and unwavering. More than I could say for myself as that howling wind was a bit unsettling.


My one causality from the storm was a knock-down of my shade garden container. Yeah yeah, it was totally my fault as I know better than to leave empty trough planters on the balcony. The wind lifted up these boxes and hit my shade planter. Ouch.

Few Photos before the Storm


Just a few photos taken before the rain, the wind and the cold of last weekend.

So far, I am liking the colors as they play against each other. Complementary colors are much more fun, and more interesting, than the old pinks, whites, and reds that I planted years ago.


The orange color of this tuberous begonia is luscious. Yes, this is how it ALL happens. I'm just walking through the nursery, minding my own business, looking for, what was it? Oh yes, I was looking for S-hooks to hold the window boxes onto the railing. Then WHAM, this orange tuberous begonia says,
Take me home!


I know that gardeners are a sympathetic group because I know this same thing has happened to each and every one of you, hasn't it?


Hey -- how did those white flowers get selected? Ah, these reflect only concession to simplicity this season. I bought the Nemesia in orange and yellow, so I grabbed the white as well.


Later this season I will be teaching everyone how to create and maintain a Martini Garden. Something to look forward to indeed!

Sunday, May 9, 2010

May 7 Progress Photos on Two-Tier Planting System

As stated in my prior entry, I got most of these two planters completed by sunset on Friday May 7 just before a storm front came into New York. Please enjoy my photos and the video posted at the bottom of this page. These photos are taken just a few minutes after I've completed most of the work. I'm exhausted though it only took about two hours to fill these lower two planters. There is nothing here that is truly unique. All of these materials are available to any person enjoying a balcony, deck, patio or small garden. As I've researched different books, websites and blogsites, I have not seen quite this much material compressed into one small spot. I look forward to working these tiers closer together as the tall plants grow and the trailers reach ever further out and down.


I have included one video for today's blog post (see below). Oh yeah, I am a chatty person.

I am just delighted with hpw my plantings are coming along, as evidenced in this short video.

And yes, those comments really did capture my feelings by the end of the day.

I hope you may enjoy it as much as I do. ABUNDANCE! I'm getting there...

May 7 Begin Two-Tier Planter System

Shopping for More Planters: I plan to do some more planting this afternoon. As you can see in the photo to the right, my Phase One is a bit boring and requires some Enhancement in order to reach that stage of Abundance I seek. In preparation for this, I stop by Home Goods. As if I could look around this store without buying anything. Is that possible? (yes, I’ve done it once or twice). I find an amazing bargain of a wrought iron hanging basket. This planter is 48” long on its back side with a drop of about 9”. It is fully lined with coco-fiber and is priced at $29.99. Frankly, this motif does not really blend with my vision of white window boxes and faux-stone planters… yet, that price is really good. I buy one to bring home and see this up close and personal. Does it make sense? What will it look like? Would the black metal be too much of a contrast? Once I take the single coco-fiber-lined planter home and set it up against the balcony railing I “see” the possibility. I quickly drive back to Home Goods to purchase the only remaining planter and stow that in the back of my car. Time now to head back to my two favorite nurseries for more plants along with several “S” hooks to hold these two planters against the railing.

Shopping for More Plants: Yes, it is true that I am now spending another $200 or so for more plantings (see video below). I am obsessed. Gee, if I amortize this over the past 11 years in which I did not plant on my balcony…. No no no. I will not succumb to justification! Pretty. I’m just looking for pretty. Yes, the woman at nursery # 2 asked if I was planting the entire grounds of the complex where I live (no!). Then, when I arrived at home and begin to unpack my three, oops, four flats of plants, one of my neighbors inquired, “where on earth are you going to be planting all of those?” For just a moment I wonder, “Have I overdone it?”

Planting Phase 2: I let the moment go and head out on the balcony to begin the Phase 2 planting of my Balcony Oasis. What I have determined is that my lush balcony will be enhanced by having a two-tier planting system. I’m quite excited by the concept. The first (top) tier is hung outside my balcony railing and tips slightly down towards the courtyard. I enjoy the plantings, yet frankly, my view is one long line of color. Just refer to my photo on the top right for an example of this -- pretty, but not yet enough. Fuller enjoyment can be found by doting upon the window boxes when I stand over them and water or trim the plants.


After I hang the coco-fiber-lined planters and prep them for planting, I am quickly horrified to find out that six (6) of my plants fill these two larger planters rather quickly. Oh boy. I have overdone the plant purchasing. I continue to plant until the sun sets and the two new planters are fairly full. I take my “leftover plants” and stow them on top of my patio table. This is my favorite video as I complete this second phase: Here you can see some of those extra plants:

With the addition of the second tier, I notice a wonderful change. These two new planters are placed on the inside of the railing, so they are visually on "my side". Yes, they cut down on my usable space in the balcony deck area. Additionally, these planters dip slightly down to my favor. In other words, my view now is of the entire depth of the plantings. Wow.


The temperature is dropping quickly. The weather predictions are for a thunderstorm on Saturday followed by a cold and windy Mother’s Day on Sunday. I believe they underestimated those condtions. Please see the next blog for some videos of those conditions.

Progress Photos - Phase 1 Window Boxes

On May 1, 2010, I planted 3 window boxes. The photos below document the progress of these 3 boxes just 7 days later:


[L. to R.]Torenia (violet moon hybrid), Nemesia (Angleart Pear), Gerbera, and a blue pansy.


The photos are beginning to show a need for the first trimback on spent flowers.


I am pleased to see that most of these plants have weathered the first week very well.


A few adjustments will be made to the plantings in the next week or so. This will will in any gaps. Did I say "gaps"? Some of these look a bit overplanted, especially for the first week.


The lovely pale yellow Calibrachoa (Cabaret Yellow) has charmed me and I returned to the nursery for additional colors.


That dahlia is actually a lovely orange, though it appears "peach" here. Same for the Gerbera.


My alyssum did not do very well. I had two 4-packs and most of them look pretty dead thus far.


Here in the last shot, croton, zinnia and gerbera. I was inspired to use the foliage plants instead of flowers for my center speciman plants. So far, I am really liking that concept.

How to Plant a Container Garden - 3 Methods

How to plant a Container Garden: This is just a review of the basics which may be useful for a beginner.

Note that I am experimenting herein with one new product and following one bit of advice on recycled plastic 1-gal bottles. By May 1, I am ready to plant my three window boxes. Although much is published on How to Plant a Container Garden, here’s a short video explanation and a new product, “Better Than Rocks”. This product is nearly 1” thick, feels a bit like a scrubby pad, and is marketed to hold the potting soil above the drainage holes. Although I find this product to be pricey, it does offer a few good features. First, it is made out of recycled plastic (so I give myself a little checkmark in my “green” department for today). Next, no odor and no rotting. This puts coco fiber to shame. By the way, a nurseryperson just informed me that squirrels just love coco fiber for lining their nests. Nah, I do not care to go that green! Fiberglass window box with stones over drainage and Better Than Rocks product:


I also selected a new planter for my first experiment with coco fiber. The metal planter ($39.99 from Home Goods) was sprayed lightly with Rust-oleum "Crystal Clear Enamel" to prevent rusting:


Inserting coco fiber into a metal planter:


The following video was inspired by the suggestion to use 1-gallon plastic jugs to lighten the weight of these large planters as well as to help with the drainage:

April 2010 Empty Balcony as a Blank Canvas

Zone 7a: I am located in western Long Island, a few hundred feet from a salt water bay. My balcony has a western exposure, with a 6' overhang protecting from most sun and rain. The balcony is further protected from the brunt of most weather by another building and mature pear trees (permitting only filtered sunlight in the late afternoon). The outside window box gets direct sun from approximately 11am through 3pm. The balcony dimensions are 6' deep and 13' wide and it is surrounded on 3 sides with an iron railing. Here is what this poor little balcony looked like in late April:


This is really pushing the season and may be too early to plant. Although the nursery stores are crowded, I am aware that the stock is sparse. We have had a few evenings with temps dropping into the high 40’s and ya know what? I don’t care – I’m ready to begin. I have purchased 3 new resin trough planting boxes and 2 resin urns to add to my 20 year old white fiberglass window boxes. Although I do not have any organized plan whatsoever, it is my intention to hang the 3 window boxes over the railing “outside” my balcony space. I am considering the trough boxes for additional plantings and the urns for specimen plants. Here is a short video of the beginning bones of this plan, er, inspiration.

Budget for 2010 Balcony Garden

Budget and Expense: A note should be entered herein on the concept of spending money for gardening. I freely admit that gardens, whether you are graced with an expansive acre or charmed with a small balcony or patio, can be a costly commitment.

Many of the blog sites I review are created by folks with more creativity than money and I applaud each and every one of these green thumbs. Yet I find myself in agreement with a statement from my older sister, “I just don’t care to wait for the seedlings to grow anymore.” Yep. My decision regarding this balcony garden is to ignore any budget constraints in 2010. I've just retired and will be spending lots of time at home. Accordingly, I will not concern myself with any budget on my garden. I just want a lush planting! I want a luscious, tropical wonderland of exotic, colorful plants. A Jungle. As an added bonus, making the neighbors a wee bit jealous would be quite fun as well.

I am keeping track of most of these expenses elsewhere, so for those readers who may want some guidelines, I'll make that available over time.

The Inspiration and the Hunt

Decision: I have not planted my balcony in 11 years and I feel it is time to renew my relationship with my petite garden space. Let’s get away from the geraniums and petunias with which I had success in prior years. No red, no pink!

The Hunt: As I drive around Long Island to find my favorite old nursery stores, I realize the depth of our recent recession. My old haunts are Gone (sigh). This is a substantial loss. We have warm, even hot, weather in late April and it is very tempting to begin planting. I do my first “rounds” by looking at the standards at Home Depot and Lowes which would be available nationwide. What do they offer to enhance my balcony gardening experience? I also check out my local Fabulous Nursery (I’m sure you all have one in your neighborhood). My short list of desires begins to take shape as I consider building the Balcony Oasis of my Dreams:

1. replace my old, damaged patio set table and eliminate one or two chairs
2. look for a trellis to allow growing vines; could these also be used to
assist in filtering the bright night lights installed in my co-op grounds?
3. Consider a water feature in the form of a small pond or a fountain

Inspiration: I pull out three of my old books on container and window box plantings. The photos are enticing. Sometimes I wonder if the joy is in the photos of the flowers, or is it in the wonder of looking at those plantings in exotic settings? I write down no notes and make no plans. There is no list of what plants to purchase. No guidelines as to how MANY plants I should purchase.

Planning is for left-brained people! I am a retired CPA, so planning is not in my current plan. Nuff said. Let the Creativity Reign.

I find a wonderful blog, “Life on the Balcony” , and get my inspiration from the author’s note on the color combination of blue and yellow/orange. In the last few days of April, I find my Inspiration pieces in the form of larger resin planters, a grape trellis, and a few flowering plants in the colors of yellow/orange and blue/purple. I am excited to get started! There is still no plan and no budget. Local garden lore decrees that it is still too early for outdoor planting.